Showing posts with label masks. Show all posts

Tuesday, September 22, 2015

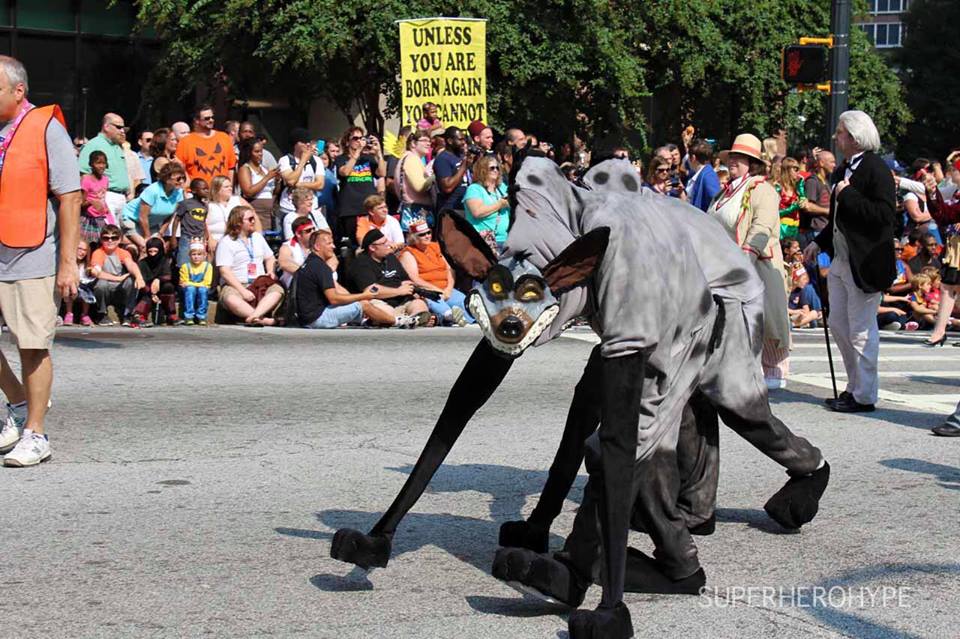
Faceless Men: Banzai and Shenzi Completed Costumes

Banzai: "Hey did we order this dinner to go?”
Shenzi: “No, why?”
Banzai: “'Cause there is goes!"  
The Lion King


We did it!  We finally completed the hyenas, and with plenty of time to spare before DragonCon!  The costumes ended up being a hit, and we somehow managed to win Best in Show in the Hallway Costume Contest out of over 300 entries.  We were thrilled!  I honesty figured we'd have no chance when we saw the number of wonderful entries, so we were floored when they announced the results at the Masquerade!


Walking in the Parade... It was miserable... .9 miles of hell.
But all of the kids yelling "Mufasa!" and the general great
reception made it 100% worth it.
Here are links to all of the tutorials we made during the construction.

1. Hind Feet
2. Masks
3. Ears
4. Front Legs
5. Neck and mounting the head

There was no tutorial for the body since we just got gray onesies, painted them, and added a tail.

It's been quite a process, but we met a lot of wonderful people at DragonCon who gave us great advice for future projects, and we are chomping at the bit for the Smooth-On projects to arrive in the mail so we can start next year's project...

If you want to stay up-to date on next years project follow us on facebook at Phenix Cosplay,

Just a hint, but the costumes next year will have to do with Fallout.

Rob Stark: Head and Neck Mounting Tutorial

When the world turns its back on you, you turn your back on the world. 
 Timon, The Lion King

This was by-far the part of the costume I was most worried about.  I had quite a few amorphous ideas about how the head would be mounted and the neck would be formed, but for quite awhile, I had no real idea of how any of it would come together.  Luckily, it did come together, and it ended up looking pretty darn cool!  We sacrificed quite a bit of visibility doing it the way we did, but we ultimately decided that we wanted to fabric all the way down to the mask from our heads.  The original Broadway costume was totally open from the head to the mask, like so:

It looks awesome, and I am pretty sure it was done that way to allow the actors to really be able to see where they were going on stage, but the way we figured, we didn't need our visibility to be quite as good, and if we were in a situation that required full range of vision, we could just un-velcro the fabric and let it hang down.  The fabric we used is surprisingly see-though, and the color ended up being pretty close to what we had done the masks and body-suits in.   We did end up cutting small eye-slits into the fabric, but I don't think they were too noticeable.

To wearable parts of our head mounts were a GoPro chest harness and a GoPro head strap.  We then took the leftover crutch bars (the tops, which were cut off to make the hand stilts) and used Thermo-Loc (an extremely hard thermal plastic that comes in little sticks, just microwave on a silicone sheet for a few seconds and its malleable.  Available at http://www.thermo-loc.com/), just to attach the crutch to the clip that goes into the chest mount.  To really make sure the crutch was secured, we wrapped the crutch in duct tape.  Before you lock the crutch bar onto the clip, though, you will want to go ahead and drill a hole on the other end.  This hole will let you attach the bar to the head eventually.

Make sure the bar is attached at an angle so that
the head is positioned properly when bent over

On the base of the masks we used the sticks of thermo-loc to make a little loop that stuck out from the bottom of the mask like so:

We added hot glue to secure
then tape over everything, just to to be safe

This hole and the hole in drilled in the aforementioned metal bar are used to attach the head to the chest mount in a way that allows it to move (with the added benefit of making it easier to put on since the head is removable).  This was accomplished with a cheap trip to the hardware store.  Using a hitch style cotter pin, a clevis pin, and a washer.

How the cotter pin, clevis pin and washer look
when put threw the mounting bar

Now that the heads are mounted on a movable platform it was necessary to get them to move in sync with our heads.  That was actually way easier then it sounds.  We took the Go Pro head mounts that came free with the chest mounts we bought and tied a piece of twine to each side of the mount.  Then glued the other end of the twine to both sides of the top of the heads.

Takes some experimentation to get the
length of twine right.

At this point the heads are wearable.


As soon as we got the heads mounted like this we realized the chest mounts for the go pro where never meant for that kind of weight and are not comfortable so we ended up adding some foam padding we had left over from the feet to the underside of the chest mounts.

The next goal was to attach the necks to cover up our faces.  We did this by using a near see-through women's blouse, with everything above the lowest point of the sleeves cut off.  We hot glued the edge of the shirt to the back edge of the heads and used velcro patches to attach to the body suit.  Don't forget to cut eye holes.  Once we had the top of the blouse attached at the top we put it on and pinned up the bottom so that we could cut off and sew up the excess to make the necks flat.

pinned up bottom before it was cut off.
Pay attention to the exposed bar and mount.
We left this open intentionally so we could see
where we where walking.  since we where low to the ground
others could not see this opening

Don't forget to add hair onto the top of the neck.

FIN!


Wednesday, July 29, 2015

Black Ears: Hyena Ear Tutorial

Oh yes, the past can hurt.  But the way I see it, you can either run from it, or learn from it.
Rafiki, The Lion King


As much as I love our hyena masks, I have been itching to see them with the ears done, because I figured that would really solidify the hyena look.  I am very happy with the end-product, and they were pretty simple, both in design and execution. 

The basic outlines are made from wire coat hangers, which we untwisted and cut into shape.  Each ear has two parts: the main ear shape, and then a single wire running down the back of the ear, to give it depth.  The two pieces are held together with thermoplastic. 

The whole ear frame

The joint for the ears, to allow them to be three-dimensional.
This angle really lets you see what I mean when
I talk about using two pieces of wire to create the shape.
Once all four ears had been assembled, it was time to cover them in fabric.

We decided to do the ears with black fur on the outside and brown fabric on the inside, since that is pretty close to the cartoon:
Not QUITE brown, but close enough
 We started by laying the outer edge of the ear down on the black fabric and hot gluing a few spots down the length of the wire, and then continued to do the spot-glue method as we pulled the fabric around the wire frame, leaving an unglued lip around the entire edge:
Once the black fabric was secure, we placed the brown fabric by spot-gluing it onto the black fabric.  The final step was to take the unglued black fabric, fold it over the wire and glue it down to create a black edge on the ears.

Finished ear from behind
Finished ear from the front
The next step was attaching the ears to the heads.  We bent the wire so that it wrapped around the back of the masks, and then hot glued each wire in place.
Like so
Once all of the wires were glued, we then reinforced everything with a bunch of duct tape. (Super sophisticated, I know).


And voila!  We finally have ears on our masks!  
Banzai

Shenzi


Monday, April 20, 2015

The Lion & The Rose: Lion King Hyena Masks


Mufasa! Mufasa! Mufasa! 
The Lion King

For the most part, this mask-making process was one great big experiment. Luckily, it worked out!  Our initial idea involved sculpting the masks out of clay, covering the clay in vaseline, doing plaster of paris over the clay, and then somehow just pulling the dried plaster off while retaining the shape.  Yeah, that didn't work.  After failing miserably at our plaster attempt after sculpting the Banzai mask, we regrouped and started looking into other options.  Ultimately, we settled on Worbla, which comes in sheets and becomes mold-able when heated. 


The biggest concern after we got the worbla was how we were going to heat it and press it into the correct form without melting the clay.  Obviously, the easiest solution to this problem is to get clay that doesn't melt, but we had already sculpted the whole thing out of clay which, as it turned out, did melt.  Based on the fact that we had more problems with applying the worbla to the Shenzi mask, I would say that if for some reason you decide you want a challenge and go for clay that will melt, coating the clay in vaseline first helps tremendously (and this vaseline layer has other uses too, so we recommend using it no matter the clay you use). 


Putting the worbla on the Banzai form

To apply the worbla, you just need a heat gun.  We folded the worbla in half and heated it all up before getting to the application because one side of the sheet had an adhesive, and by "gluing" the two sides together, we ended up with a sturdier end-product.  If you were just putting the worbla onto a foam base (for armor or something like that), you wouldn't need to go through that extra step.  Once the two sides were put together, we just heated it up and molded it onto the clay as best we could.  Application of the worbla ended up being a bit tricky, just due to the weirdly-shaped mask, but other than a few seams and a few misplaced wrinkles, we were really pleased with the end result.

Worbla applied to Banzai form
Once the worbla was molded onto the clay, we used a spray primer to coat the whole thing.  We were hoping that this would help cover up the seams, but as it turned out we needed some additional work to mask those. 
Primered Banzai mask
Once the mask was sprayed with primer and dry, we got to work digging the clay out.  Once again, we learned that a vaseline layer over he clay was helpful here.  The clay came out of the Banzai mask much more easily than it came out of the Shenzi mask.  Once we had the Banzai mask all molded and spray-primered, we got to work on the Shenzi mask.  The process was basically the same, although we had quite a bit more trouble with melting, and ended up basically losing the entire sculpt on the left eye.  To fix it, we ended up with applying worbla on top in the shape we had originally sculpted.  I wasn't 100% thrilled with the result, but it ended up working out and looking fine once all of the paint was applied.

Side view of Shenzi sculpt

Shenzi sculpt


Worbla on Shenzi, Banzai covered in primer
Primer applied to Shenzi
Once we got both of the masks coated in primer and realized that the seams were still pretty visible, we purchased a jar of modeling paste, which let us fill in the seams and then sand the dried paste down to create a smooth form.
To help us cover, up the seams
Seams covered in Liquitex

Seams covered in Liquitex

Sanded Liquitex

Sanded Liquitex

There were, admittedly, still some errant wrinkles on the lips after the molding paste was applied, but we were sufficiently happy (and not sure how fixable they were) and decided to move forward with the paint job.  For painting, we used createx airbrush paints, and mixed together black and white to create our desired shade of gray.  We settled on the createx because it also works on fabric, and we wanted to be able to color-match our body-suits to our masks.  We opted to go a hair lighter than the hyenas were in the movie, just because we figured the features and other paint would stand out more in person if we weren't a super dark gray. 

Airbrushing Banzai
Masks drying after getting their first coat of gray
Faces being painted
Once we got the masks painted, we added on the final touches of teeth and hair.  For the teeth, we just used foam strips, which we hot glued into the mouths and then carved to look like teeth.  Once the carving was done, we added white paint to the foam to make the teeth pop.  For the hair, we used roving wool, which I simply rolled and then hot glued to the masks.  For Shenzi, we just needed the forelock.  Banzai needed a tuft on top of the head and some bushy eyebrows.

Finished Shenzi Mask!

Banzai nearly finished, just needs his eyebrows in this one

Add caption
Finished Banzai mask!